
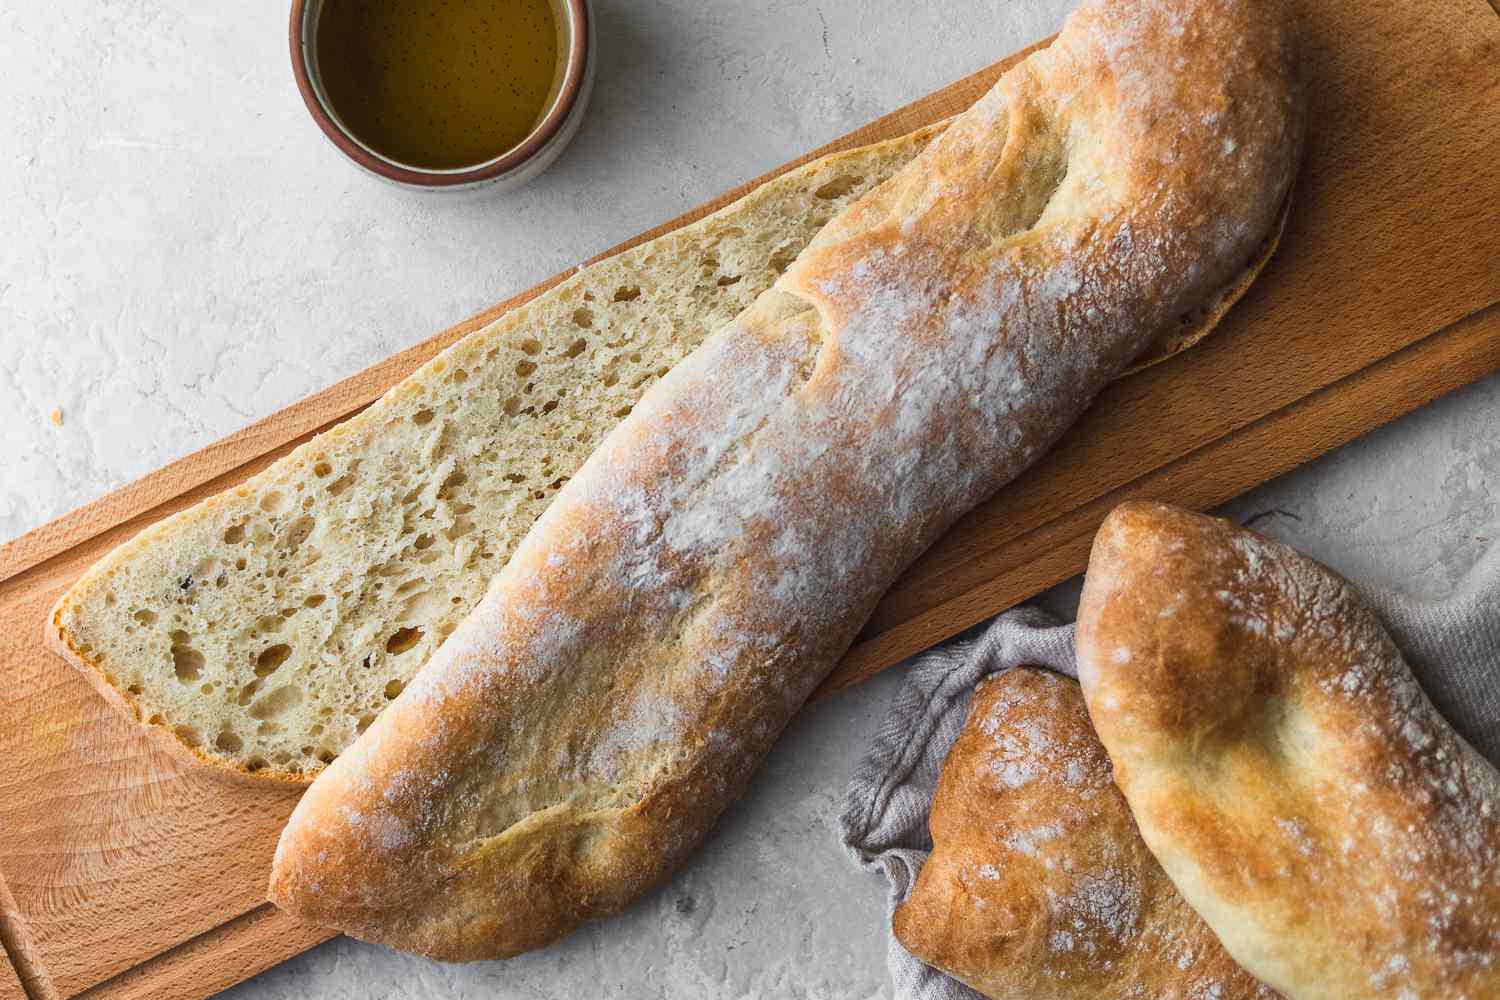
Ciabatta bread is a classic Italian bread known for its crisp crust and airy, chewy interior. This recipe is perfect for those who love the rustic charm of homemade bread. With just a few simple ingredients, you can create a delicious loaf that pairs wonderfully with soups, salads, or simply dipped in olive oil.
All the ingredients in this recipe are commonly found in most kitchens. However, if you don't bake often, you might need to pick up instant yeast from the supermarket. It's crucial for the bread's rise and texture. Make sure to get all-purpose flour as it provides the right balance of protein for this bread.
Ingredients for Ciabatta Bread Recipe
All-purpose flour: The main ingredient that forms the structure of the bread.
Salt: Enhances the flavor of the bread.
Instant yeast: Helps the dough rise and gives the bread its airy texture.
Lukewarm water: Activates the yeast and combines the ingredients into a dough.
Technique Tip for Making Ciabatta
When mixing the dough, use a wooden spoon or your hands to ensure all the flour is fully incorporated. The dough should be sticky and wet, which is essential for achieving the characteristic open crumb structure of ciabatta. Avoid adding extra flour as this can make the bread dense.
Suggested Side Dishes
Alternative Ingredients
all-purpose flour - Substitute with bread flour: Bread flour has a higher protein content, which can give the ciabatta bread a chewier texture and better structure.
all-purpose flour - Substitute with whole wheat flour: Whole wheat flour adds a nutty flavor and more fiber, but it may make the bread denser. Consider using a mix of whole wheat flour and all-purpose flour for better results.
salt - Substitute with sea salt: Sea salt can provide a slightly different flavor profile and may contain additional minerals.
salt - Substitute with kosher salt: Kosher salt has larger grains and a milder flavor. You may need to adjust the quantity slightly to taste.
instant yeast - Substitute with active dry yeast: Active dry yeast can be used, but it needs to be dissolved in water before mixing with other ingredients. Use the same amount but activate it in a small amount of the lukewarm water from the recipe.
instant yeast - Substitute with fresh yeast: Fresh yeast can be used, but you will need to use about three times the amount of instant yeast. Dissolve it in the lukewarm water before adding to the flour.
lukewarm water - Substitute with milk: Milk can add a richer flavor and softer texture to the ciabatta bread. Use the same amount but ensure it is lukewarm.
lukewarm water - Substitute with beer: Beer can add a unique flavor and help with the leavening process. Use the same amount and ensure it is at room temperature.
Alternative Recipes Similar to Ciabatta
How to Store or Freeze Your Ciabatta
- Allow the ciabatta bread to cool completely on a wire rack before storing. This prevents condensation from forming inside the storage container, which can make the bread soggy.
- For short-term storage, place the ciabatta bread in a paper bag or wrap it in a clean kitchen towel. This helps maintain the crust's crispiness while keeping the interior soft.
- If you prefer using plastic, wrap the ciabatta bread tightly in plastic wrap or place it in a resealable plastic bag. This method will keep the bread soft but may soften the crust.
- Store the wrapped ciabatta bread at room temperature for up to 2 days. Avoid refrigerating the bread, as it can cause it to dry out and become stale faster.
- For longer storage, consider freezing the ciabatta bread. Slice the loaf into individual portions before freezing, so you can thaw only what you need.
- Wrap each slice or portion of ciabatta bread tightly in plastic wrap or aluminum foil. Place the wrapped slices in a resealable freezer bag, removing as much air as possible before sealing.
- Label the freezer bag with the date to keep track of freshness. Ciabatta bread can be frozen for up to 3 months.
- To thaw frozen ciabatta bread, remove the desired number of slices from the freezer and let them sit at room temperature for about 30 minutes. Alternatively, you can reheat the slices in a preheated oven at 180°C (350°F) for 10-15 minutes.
- For a crispier crust, lightly mist the ciabatta bread with water before reheating in the oven. This will help restore some of the original texture.
- Enjoy your ciabatta bread with your favorite soups, salads, or as a base for delicious sandwiches.
How to Reheat Leftovers
Preheat your oven to 180°C (350°F). Wrap the ciabatta bread in aluminum foil to prevent it from drying out. Place it directly on the oven rack and heat for about 10-15 minutes until warmed through.
For a quick reheat, slice the ciabatta bread and place the slices in a toaster or toaster oven. Toast on a low setting until the bread is warm and slightly crispy.
If you prefer a softer texture, lightly mist the ciabatta bread with water before wrapping it in aluminum foil. Place it in a preheated oven at 180°C (350°F) for about 10 minutes.
For a stovetop method, heat a non-stick skillet over medium heat. Place the ciabatta bread slices in the skillet and cover with a lid. Heat for 2-3 minutes on each side until warmed through.
To reheat in a microwave, wrap the ciabatta bread in a damp paper towel and place it on a microwave-safe plate. Heat on medium power for 20-30 seconds, checking to ensure it doesn't become too chewy.
For a crispy crust, preheat your oven to 200°C (392°F). Place the ciabatta bread directly on the oven rack without wrapping it. Heat for 5-7 minutes until the crust is crispy and the inside is warm.
Essential Tools for Making Ciabatta
Mixing bowl: A large container used to combine the flour, salt, and yeast with water to form the dough.
Damp cloth: Used to cover the mixing bowl, keeping the dough moist and allowing it to rise properly.
Baking sheet: A flat sheet used to hold the dough while it bakes in the oven.
Parchment paper: Lining the baking sheet with this prevents the dough from sticking and makes cleanup easier.
Wire rack: A cooling rack that allows air to circulate around the bread, helping it cool evenly and preventing the bottom from becoming soggy.
Oven: Preheated to 220°C (428°F), this is where the dough is baked into ciabatta bread.
Measuring cups: Used to measure the lukewarm water accurately.
Measuring scale: Ensures precise measurement of the flour, salt, and yeast for consistent results.
Spatula: Useful for transferring the sticky dough from the mixing bowl to the baking sheet.
Oven mitts: Protect your hands when placing the dough in the oven and removing the baked bread.
Knife: Used to slice the ciabatta bread once it has cooled.
How to Save Time on Making Ciabatta
Measure ingredients ahead: Pre-measure all flour, salt, and yeast to streamline the mixing process.
Use a stand mixer: Utilize a stand mixer with a dough hook to mix the dough quickly and efficiently.
Warm environment: Let the dough rise in a warm spot to speed up the rising process.
Preheat oven early: Start preheating your oven while the dough is rising to save time.
Shape on parchment: Shape the dough directly on the parchment paper to avoid transferring and reshaping.
Ciabatta Bread Recipe
Ingredients
Main Ingredients
- 500 g All-purpose flour
- 10 g Salt
- 7 g Instant yeast
- 400 ml Water Lukewarm
Instructions
- 1. In a large mixing bowl, combine the flour, salt, and yeast.
- 2. Gradually add the lukewarm water and mix until a sticky dough forms.
- 3. Cover the bowl with a damp cloth and let it rise for 1-2 hours until doubled in size.
- 4. Preheat your oven to 220°C (428°F).
- 5. Line a baking sheet with parchment paper.
- 6. Transfer the dough onto the baking sheet and shape it into a loaf.
- 7. Bake for 25 minutes or until the crust is golden brown.
- 8. Let the bread cool on a wire rack before slicing.
Nutritional Value
Keywords
More Amazing Recipes to Try 🙂
- Italian Meatballs in Marinara Sauce Recipe45 Minutes
- Italian Cookies with Icing Recipe35 Minutes
- Okra Soup Recipe45 Minutes
- TikTok Ramen Recipe15 Minutes
- Thai Sweet Sticky Rice with Mango Recipe50 Minutes
- Four Bean Salad Recipe15 Minutes
- Grilled Tomato and Feta Sandwich Recipe15 Minutes
- Italian Sausage Patties Recipe25 Minutes
Leave a Reply